Manage the SLNX Embedded Settings
You can manage the settings related to authentication and printing for devices with RICOH Streamline NX (SLNX) specific Embedded Applications installed. Combine these settings to create an Embedded Settings Profile that can be used within a device template. Device Templates can be applied to specific devices running the SLNX-specific Embedded Applications.
SNMP, Device Administrator, and SDK/J Platform access accounts are required to manage SLNX Embedded Applications. Refer to Configure Access Accounts.
Create an Embedded Setting Profile
An Embedded Settings Profile is comprised of subsettings that must be completed BEFORE you can create a full profile under [Configuration] ® [Streamline NX Embedded Settings] ® [Embedded Setting].
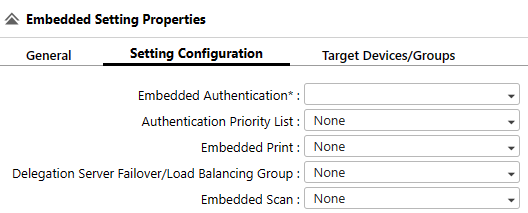
The options on the Setting Configuration tab must be configured elsewhere within the Streamline NX Embedded Settings configuration options before they will appear for selection in this tab.
1. Configure all Embedded settings
First, follow the links below to configure all required subsettings, and then create an Embedded Settings Profile that you can include in a Embedded applications template.
|
Configuration |
Notes |
|---|---|
|
Configure the Embedded Login Screen (Optional - not included in an Embedded Profile) |
Customize the screen image and buttons displayed when a user logs in to a device. You can also select from preset login screens. |
|
Configure the Embedded Authentication Properties (Embedded Authentication) |
Configure the card reader settings and login method. |
|
Configure Authentication Priority (Authentication Priority List) |
Create a list of priority orders for authentication profiles. A user performs authentication on a device, starting with the authentication profile with the highest order of priority. |
|
Configure Embedded Print Properties (Embedded Print) |
Configure the settings such as the sort order of the jobs to be displayed on the print screen, logout actions, etc. |
|
Configure Embedded Scan Properties (Embedded Scan) |
Configure settings such enabling or disabling the back key on the MFP, or choose a default scan file format if the device does not the OCR module installed. |
|
Configure Load Balancing and Failover (Delegation Server Failover / Load Balancing Group) |
Specify the Delegation Server for performing authentication, printing, and delivery functions. When a Delegation Server (Delegation Server Failover/Load Balancing Groups) is not specified in [Embedded Setting], the Delegation Server with the installed Streamline NX Embedded Application performs authentication, printing, and delivery functions. For details, refer to Balance Server Workload. |
2. Configure the Profile
-
Click [Configuration] ® [Streamline NX Embedded Settings] ® [Embedded Setting].
-
Click [Add].
-
On the General tab, enter a name and description for this embedded setting profile. You will identify the profile by this name when you add it to an Embedded Applications configuration template.
-
On the Setting Configuration tab, select the options you want to include in the template. Only the Embedded Authentication selection is required.
-
On the Target Devices/Groups tab, select [Add Target Group] and/or [Add Target Device]. You can specify a single device, or you can specify a combination of entire groups plus individual devices.
-
Click [Save].
3. Add the Profile to an Embedded Applications Template
For instructions, refer to Embedded Applications Template
For details about the document delivery application of SLNX, refer to Scan & Capture Overview.