FIDO2 Passkey Authentication
SLNX can integrate with FIDO2 passkeys to enable passwordless authentication. Integration is achieved by installing one of the following embedded installation packages on the target devices:
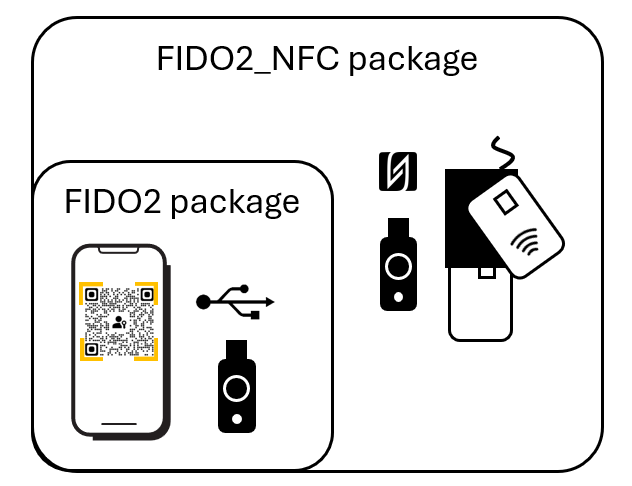
SLNX FIDO2 Embedded: Install this package if using only mobile authentication or USB-based security keys (no smartcard reader needed)
FIDO2_NFC Embedded: Install this package if using NFC-based security keys or smartcards (smartcard reader needed)
Once at the MFP, the user will select an OIDC authentication profile. The user can proceed to authenticate using one of these methods:
| Authenticator | Authentication Gesture |
|---|---|
| Mobile device with Android or IOS versions that supports passkeys | Users can authenticate with biometric data such as fingerprint or face recognition. Users can also authenticate with the mobile device PIN. The MFP and the mobile device must have access to the internet, and both must have Bluetooth enabled. |
| USB-based security key | After inserting the USB key, users can authenticate with a fingerprint or by entering a PIN. |
| FIDO2 smart card | Users can tap or insert their card into the card reader, and then authenticate with a PIN. |
| NFC-based security key | Users can tap their NFC-key on the card reader, and then authenticate with a PIN. |
For information about the workflow from the MFP user point of view, refer to Authenticate with FIDO2 Passkeys and Mobile Authentication with FIDO2 Passkeys.
Supported Security Keys and Smart Card Support
FIDO 2.0 and FIDO 2.1 cards and keys are supported.
FIDO2 security key: USB or NFC contact-less with a smart card reader.
FIDO2 smart cards: Contact or NFC contact-less with a smart card reader.
Multiple versions of FIDO2 may be present on a single security key. Note that although user verification by PIN is supported in FIDO 2.0 and FIDO 2.1, biometric verification is supported only when the versions property on the key includes FIDO_2_0 (backward compatibility for higher key versions).
Supported Mobile Versions
Android 14 – Note that facial recognition may not be supported on all models
iOS 17
iOS 18
Supported Card Readers
These NFC contact-less smart card readers are supported:
Elatec: TWN4
HID: ONMIKEY Smart Card Reader 5022
Inepro: Spider (with CCID firmware)
These dual card readers are supported (contact and NFC contact-less)
Elatec: TWN4
Prerequisites
A corresponding Open ID Connect (OIDC) authentication profile must be correctly configured as the authentication profile in SLNX. Refer to Open ID Connect Authentication and Setup OpenID Connect (OIDC) Authentication Profile.
If an SLNX FIDO2 package is installed, the username/password authentication with an OIDC profile is handled by the application that provides FIDO2.
Passkeys must be linked to the user accounts that will login to the MFP. Refer to https://support.microsoft.com/en-us/account-billing/set-up-a-security-key-as-your-verification-method-2911cacd-efa5-4593-ae22-e09ae14c6698 for instructions. Users must register each passkey with their account.
Configuration Workflow
To push the required embedded package to the MFP’s, follow this workflow.
Some steps must be performed at the MFP itself. Where possible, the workflow below has been streamlined to minimize physical trips to the MFPs.
1. Upload Embedded Files to SLNX
2. Enable Card Reader and OIDC Authentication
3. Create and Run the Install Task
4. Connect the Card Readers and Reboot (required if using a supported card reader only)
1. Upload Embedded Files to SLNX
To push the appropriate files to the MFPs, you must create an embedded application template that contains the correct FIDO2 embedded package.
These files are distributed with the Streamline NX installer files and are located in the Embedded Files folder of the installer.
Install the FIDO2_NFC package only if using smartcards or NFC contact-less (smart card reader necessary). After installing the FIDO2_NFC package on the MFPs, it is necessary to reboot the machine, update the correct card reader setting in Embedded Authentication, and then force another reboot of the machine.
Create a template using either the FIDO2 or FIDO2_NFC embedded application that you can apply to target devices.
Login to Streamline NX. You must login with Device Administrator privileges to perform this task.
In the SLNX Management Console, click [Configuration] ® [Configuration Templates] ® [Embedded Applications].
Click [Add].
Enter a name for the template, such as 'FIDO2 Embedded Application'. Enter an optional description.
From the [Application Source] list, select [Local File] and then enable [Upload New File to Repository].
Click [Choose Files], locate the FIDO2 or FIDO2_NFC package, click [Open] and then click [Upload].
If you are using card readers, you must install the FIDO2_NFC package.
Click [OK] to save the template.
In a later step, you will create a task to install the template on the MFPs.
2. Enable Card Reader and OIDC Authentication
If you are installing the FIDO2_NFC embedded package, complete these additional steps to enable the card reader authentication.
Step 1 and 2 below are necessary only if you are installing FIDO2_NFC embedded. If not using card readers, perform steps 3 and 4 to set the Login method to OIDC.
Click [Configuration] ® [Streamline NX Embedded Settings] ® [Embedded Authentication].
From the Card Reader field, select [Smartcard reader].
Ensure the Login Method – Default Authentication Profile field is set to [OIDC].
Click [Save].
Refer to Configure the Embedded Authentication Properties for additional field-level information.
3. Create and Run the Install Task
The installation task will install the embedded package on the devices you specify.
Click [Configuration]®[Configuration Tasks].
Click
 [Add].
On the General tab, enter a [Name] for the installation task (i.e. SLNX FIDO2 Embedded). Enter a description if preferred.
For Type, select [Apply].
On the Template tab, enable [Force Reboot after Template Execution] and then click
 [Select Target Template]. From the list of available templates on the left, select the template that contains the FIDO2 or FIDO2_NFC embedded template you created previously and then click Move Right ▶ to place it in the Target Template list. Click [OK] to close the window.
 On the Target Devices/Groups tab, click either [Add Target Device] or [Add Target Group] to identify the MFP’s on which you will install the FIDO2 embedded application files.
Click
 [Save] to save the task, and then click
  [Run Immediately] to run the task and install the application on the MFP.
After installing this application, wait a full minute after the install task completes and confirm that the start-up screen appears on at least one of the target MFPs before proceeding.
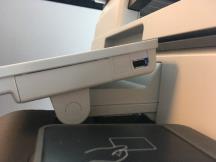
4. Connect the Card Readers and Reboot
This step is required only if you installed the FIOD2_NFC embedded package. You can now physically install the Card Readers at each MFP. The card reader must remain attached to the camera port on the MFP’s smart panel.
Connect the card reader to the camera USB slot located on the right side of the smart operation panel.
The card reader plugs into the standard USB Camera port built into the MFPs. For specific location of this port, refer to the MFP service manual. You may need to remove the plastic guard from the smart operation panel to access the camera USB slot. Refer to the image below for the specific location on the panel.
Reboot the MFP, and then confirm that the login screen appears.
Limitations
On some Samsung mobile devices, a text may appear on the mobile device after the QR code is scanned to authenticate, but authentication does not proceed because the QR link has been misinterpreted. This text appears as "Note", followed by "FIDO: ...". To correct this problem, the user at the MFP should tap the Return button, and then select the Passkey option again.
When Android users insert a USB-based security key on the MFP, a Web Authentication message appears each time. The User must tap OK when presented with the message "Allow Web Authentication access to xx".
The keyboard emulation One-Time Password (OTP) feature must be deactivated on USB-based security keys; otherwise, the key will not work when inserted in the MFP. Follow the manufacturer's instructions to deactivate OTP.
Enable Detailed Logs
Detailed logs may be helpful to trace or investigate authentication problems. These logs should be enabled only upon request from a Ricoh support representative.
To complete this task, you must login to SLNX with the customer engineer role. Only this role can view the Advanced System Settings Editor in the Streamline NX Management Console.
In the Advanced System Settings Editor tab, click [View] and choose [Delegation Server] settings.
Select [Global Settings].
Add or update the following key:
Key: webauth.loglevel
Type: Text
Value: TRACE
Save the key.
Refer to Debug Log Download for details on retrieving the log.