Configure the Embedded Login Screen

  1. Click [Configuration][Streamline NX Embedded Settings][Embedded Login Screen].

  2. Click [Add].

  3. Enter the screen name and description on the [General] tab.

  4. Configure the login screen on the [WVGA] tab. Refer to [WVGA] tab below. As you make selections, a preview of the login screen configuration appears to the right so you can preview what the user will see.

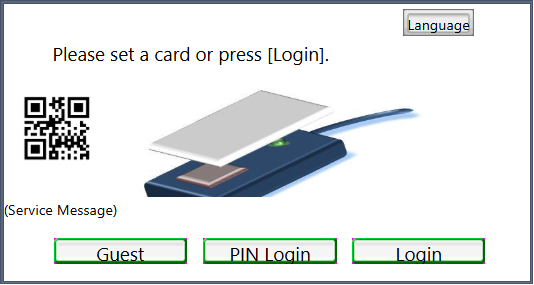
    Configure the screen background color, message, button style, and other settings.

    To upload a new image file, click [Browse] to select the image file, and then click [Upload].

  5. To display a QR code on the Login screen that the user can scan to login, scroll to the bottom of the options and enable the [Display Device QR Code] checkbox.

  6. Configure the [4.3 inch] tab or the [Smart Operation Panel] tab.

    Configure the login screen to be displayed on an MFP that is equipped with a 4.3-inch screen or [Smart Operation Panel] screen.

    Some of the available settings are the same as [WVGA] tab

    Specify whether or not to apply the same settings as the WVGA login screen.

    To apply different settings than the WVGA login screen, clear the check box, and then configure the settings. The same setting items as the WVGA tab are available.

  7. Click [Save] when the settings are complete.

[WVGA] tab

Item

Description

Screen Background Color

Specify the background color of the screen. Enter the color code in hexadecimal notation. You can also select the color from the color palette.

The default is #FFFFFF (white).

Screen Message

  • Show Message: Select the check box to display a message on the login screen. To use Service Message, it is necessary that a message is sent from Helpdesk system via an external interface of RICOH Streamline NX. Notification from Helpdesk system can be displayed on the login screen. When linking to an external system such as Helpdesk system, contact your RICOH service representative.

  • Message: Select the language of the message to be displayed on the login screen, and enter the message text.

  • Message Background Color: Specify the background color of the message. Enter the color code in hexadecimal notation. You can also select the color from the color palette. To specify transparent background color, enter #ff00ff. The default is #FFFFFF (white).

  • Font Size: Select the size of the characters in the message. The default is Large.

  • Font Color: Specify the color of the characters in the message. Enter the color code in hexadecimal notation. You can also select the color from the color palette. The default is #000000 (black).

Service Message
  • Message: Select the language of the message to be displayed on the login screen, and enter the message text.

  • Message Background Color: Specify the background color of the message. Enter the color code in hexadecimal notation. You can also select the color from the color palette. To specify transparent background color, enter #ff00ff. The default is #FFFFFF (white).

  • Font Size: Select the size of the characters in the message. The default is Large.

  • Font Color: Specify the color of the characters in the message. Enter the color code in hexadecimal notation. You can also select the color from the color palette. The default is #000000 (black).

Language Button

  • Button Title: Specify this setting for each language. Select the language, and then enter the label name.

  • Button Style: Select the button style. The default is [Green Edge].

  • Font Size: Select the size of the characters in the message. The default is Large.

  • Font Color: Specify the color of the characters in the message. Enter the color code in hexadecimal notation. You can also select the color from the color palette. The default is #000000 (black).

  • Alignment: Select the location of the text on the button. The default is Center.

User PIN Login Button

Configure the appearance of the PIN Login button: 

  • Button Title: You can specify the text that will appear on the button for each language. Select the language, and then enter the label name. By default, the text is "PIN Login".

  • Button Style: Select the button style. The default is [Green Edge].

  • Font Size: Select the size of the characters in the message. The default is Large.

  • Font Color: Specify the color of the characters in the message. Enter the color code in hexadecimal notation. You can also select the color from the color palette. The default is #000000 (black).

  • Alignment: Select the location of the text on the User PIN button. The default is Center.

Login Button

Configure the appearance of the Login button: 

  • Button Title: You can specify the text that will appear on the button for each language. Select the language, and then enter the label name. By default, the text is "PIN Login".

  • Button Style: Select the button style. The default is [Green Edge].

  • Font Size: Select the size of the characters in the message. The default is Large.

  • Font Color: Specify the color of the characters in the message. Enter the color code in hexadecimal notation. You can also select the color from the color palette. The default is #000000 (black).

  • Alignment: Select the location of the text on the Login button. The default is Center.

Show Screen Background

Displays an image on the login screen.

Choose File: Import an image to be displayed as the new image of the card reader. An image of up to 128 KB can be imported.

The specifications of the images that can be imported are as follows:

  • Length

    WVGA: 800 px, 4.3 inch: 480 px, Smart Operation

    Panel: 1024 px

  • Height

    WVGA: 444 px, 4.3 inch: 256 px, Smart Operation

    Panel: 520 px

  • File Size

    WVGA: 128 KB, 4.3 inch: 128 KB, Smart Operation

    Panel: 2 MB

  • Format

    JPEG, PNG

Display Device QR Code

Enable this option to display a QR code on the Login screen. The user can scan the QR code to use a mobile device for authentication.

The QR code is generated in real-time when the user taps the SLNX application, and is based on the IPv4 address obtained from the embedded device.

Specifying the color

When you specify #FF00FF (magenta) for the color, the corresponding parts in the custom screen become transparent on both the preview screen and the device's operation panel.

When you specify the color in the range between #FF00FF and #FF00E5, the corresponding parts in the custom screen become transparent on the Standard Operation Panel and 4.3 inch screen even if the magenta color is displayed on the preview screen.

By specifying a value slightly different from the above values such as #FF00E4, a color close to magenta can be displayed on the device's operation panel.