Secure Print Configuration for Laser Printers
SLNX version 25R1 and later supports Server and Client Secure print for On-premise and Cloud environments for these models:
-
P 501/502
-
P 800
-
P C600
Google Cloud environments are not supported.
To enable this support in SLNX, the Administrator must modify the SP mode on the device, and install a custom SLNX LP application via WIM.
The process you must follow to obtain the custom application is provided below.
When the application starts on the device, it contacts the SLNX Delegation Server to attempt a license download and obtain the current configuration. Once the device receives a valid license, it will identify the USB card reader and validate that the device is supported. If this device is not supported, an error will be logged.
When a card is swiped or tapped on the attached card reader, the application decodes the card number and authenticates against the Delegation Server. If authentication fails (or the card is not valid), an error will be logged. If authentication is successful, the device will request the list of print jobs for the authenticated user.
Prerequisites
-
The supported laser printer must have a Hard Disk Drive Option installed
-
A supported proximity USB HID card reader must be attached to a USB Type-A port at the rear of the device
-
Administrative access to the target device via WIM
-
A valid embedded license is required
Limitations
-
The following features are not supported: Accounting, PSA, Delegation Print, Hold Print, Direct Print.
-
Print Rules are not processed on the LP device (they will be evaluated by the Delegation Server or PC Client, standard existing functionality).
-
Manual logins (username/password) are not supported.
-
Installing or deleting apps on the device requires a device reboot.
Configuration Workflow
To configure the laser printer, follow these steps in the order listed:
2. Update the SP mode on the Target Devices
3. Install the LpPrint.mod file via WIM
4. Change the Authentication Settings
1. Create a Custom Request
A customized package must be prepared for your Delegation Server and environment. Contact RICOH support and request the DM Property File Generator application.
Ricoh Support will:
-
Create an SLNXES ticket.
-
Provide you with the link to the DM Property File Generator.zip file so that you can generate a dm.properties file (see below).
-
Ask you for ONE administrator email address that will be given access to a RICOH file storage location to download a custom mod file, once created.
Once you have downloaded the DM Property File Generator, zip file:
-
Unzip the file and then refer to the ReadMe.pdf file to create a dm.properties file from your SLNX Delegation Server.
-
Upload the generated dm.properties file to the RICOH file storage location provided in the ticket.
At this point, wait for a Ricoh representative to generate a custom package and upload it to the RICOH file storage location. Once the package is available, the ticket status will be updated to notify you that it is ready. Download the custom package (LpPrint.mod file) and then follow the instructions below to configure the laser printers.
2. Update the SP mode on the Target Devices
Enable USB HID devices via SP mode change. These instructions must be performed at the device. You must have device administrator access to the device SP mode.
-
To enter SP mode, hold the Up and Down arrow buttons for 5 seconds. Release the buttons and tap OK. You will see “[SP Mode(Service)]”
-
Use the cursor keys to navigate to 5-844-100 and change it from the default:
-
Navigate to “Engine” and tap OK
-
Navigate to “5. Mode” and tap OK
-
Navigate to “5.844” and tap OK
-
Navigate to “5.844.100” and tap OK
-
Change from “1” to “0” (if necessary) and tap OK
-
Tap Escape until back at “[SP Mode(Service)]”
-
Select “End” and tap OK
-
-
Reboot the device.
3. Install the LpPrint.mod file via WIM
In this step, you will access the device WIM to upload the custom LpPrint.mod package that you downloaded from the RICOH storage location.
-
Login to the WIM as an administrative user.
-
Navigate to Configuration -> Extended Feature Settings/Install.
-
Browse to [Local File] and locate the custom LpPrint.mod file.
-
Click Display Extended Feature List.
-
Select the SLNX LP Print installable.
-
Install to Device HDD.
-
Log out of the device.
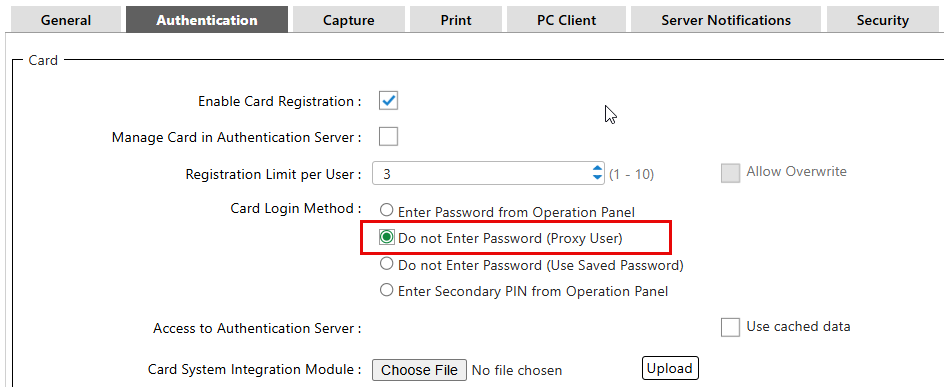
4. Change the Authentication Settings
Complete these steps in the SLNX Management Console to disable password logins.
This change will affect ALL card logins (not just LP Print), with the result that all card logins on any machines connected to this Delegation Server will no longer require password login. RICOH recommends establishing a dedicated Delegation Server to manage laser printers if other devices require password login.
-
Login to the SLNX Management console with Device Administrator privileges.
-
Click [System] ® [Server Settings] ® [Delegation Server Settings].
-
On the Authentication tab, enable the setting 'Do not Enter Password (Proxy User)', located under the Card Login Method options.
-
Save the change.
Troubleshooting
If users are unable to release print jobs at the laser printers, use the following information to troubleshoot:
-
Ensure the card readers are compatible. Confirm card reader compatibility with Ricoh Support.
If you change the card reader, plug in the new card reader and then restart the laser printer.
-
Ensure the login method is set to 'Do not Enter Password (Proxy User)' in 4. Change the Authentication Settings above.
-
Load balancer association – If using a load balancer for the Delegation Server ensure that you configure the load balancer association in the SLNX Management Console. Refer to Configure the Load Balancer Association for instructions.
-
Logs are available under System® Logs ® Notification Log.