Send to RightFax
The Send to RightFax connector allows users to send scanned documents via facsimile using the RightFax fax provider. The Send to RightFax connector only supports the functions provided by your RightFax server. For details about RightFax functions, refer to the RightFax manuals.
This connector can only be added to a workflow whose [Job Processing Location] is set to [On Server].
Create RightFax Proxy User Accounts with administrator privileges. This account must not integrate with Windows NT.
FaxUtil, the RightFax client software, must be installed on the Core Server or Delegation Server specified as the Configuration Validation Server, as well as on the server used for delivery.
You can use FaxUtil, the RightFax client software, to check the status of a Send to RightFax job.
Prerequisites
-
RightFax Server version 20.2 or later is supported.
-
RightFax FaxUtil (Client) version 16.2 or later must be installed.
-
RightFax COM API object must be installed manually in SLNX Core and DS server for FaxUtil 16.6 and above.
Notes for RightFax Server version 20.2 and 21.2
-
Ensure RightFax Server and FaxUtil are installed on the same server.
-
Check the connection by sending a fax using the FaxUtil. If the fax return error, try adding channels to RightFax server. Refer to RightFax documentation.
-
Both Enable and Disable Secure TCP/IP in RightFax Enterprise Fax Manager (EFM) are supported. To do this, follow the steps below:
-
In RightFax Enterprise Fax Manager (EFM), in the left pane, expand the server, and then click Services.
-
In the list of services in the right pane, double-click RightFax Server Module. The Server Configuration window opens.
-
In the Server Configuration window, go to General tab and
-
Check (to enable) or Uncheck (to disable) the Enable Secure TCP/IP Communication
Manual Installation of COM API object for FaxUtil 16.6 or later
-
Download RightFax COM API Zip File from OpenText website
-
The RightFax COM object is contained in the dynamic link library (DLL) with filename RFCOMAPI.dll
-
In the location where SDK is installed, run the command regsvr32 RFCOMAPI.dll
-
Make sure to perform step 1 to 3 in both SLNX Core and DS
-
To check if the COM object is properly installed, test the connection using Send to RightFax connector in SLNX
Create the Connector
-
From the Navigation tree, click [Workflow] and then click select [Shared Connector Settings].
-
On the [Shared Connector Settings] tab, click
 [Add].
 -
When the Create Shared Connector screen appears, provide the following information:
|
Setting |
Options |
|---|---|
|
Connector Name |
Enter a unique name in the [Name] field that you can use to identify this as the RighFax connector in the list. |
|
Description |
Enter a description that you and other Administrators can use to easily identify this connector in the Shared Connector Settings list [if you need to modify the settings later, for example]. |
|
Connector Category |
Select Destination. |
|
Connector Type |
Select Send to RightFax. |
|
Location |
Note: This connector is available for On Server workflows only. The location is not editable. |
-
Click [OK] to continue.
You will now see four active tabs: General, Setting, Preset, and Workflows.
-
Switch to the [Setting] tab.
Optionally, you can set a language-specific display name. Choose each language and then enter the corresponding text that will appear on the MFP.
-
Complete the following fields in the RightFax Server Settings section. Refer to Send to RightFax Settings for full descriptions.
-
Proxy User: The account in User ID field will be used to authenticate to RightFax server and faxes will be sent to recipient(s) using the User ID.
-
Login User: The MFP user account will be used to authenticate to RightFax server. Make sure the MFP user account is associated to RightFax with administrator privilege. Enforce Strict Security option is available if Login User is selected.
-
Enforce Strict Security: If checked, the MFP user account must be integrated to Windows NT Security to use the workflow. The login account must be registered to both RightFax and Active Directory server. If uncheck, the MFP login user do not need to be integrated to NT, the workflow can be opened as long as login user has administration privilege to access RightFax server.
|
Setting |
Description |
|---|---|
|
RightFax Server |
Enter the RightFax server name or IP address. Click Ping button to check the connection to RightFax server. Ping returns successful if the server name or IP address is reachable from your SLNX server, else it will return error. |
|
User ID and Password |
Enter the User ID and Password of the RightFax account that has access to RightFax Server. Make sure that the account has administration privilege and must not be integrated to Windows NT Security. User ID is required even for Login User authentication method. This will allow Administrator to preset fax destinations and use as authentication credential if Use Proxy Authentication is set in Job Settings. |
|
Authentication Method |
Select the authentication type to use to connect to RightFax server. |
|
Test Fax Number |
Allows you to check your RightFax server configuration by providing the fax number of a known and active fax number. The test returns successful if your RightFax configuration is correct. |
-
Configure the following fields in Phonebook Display and Search Settings section.
-
If you plan to prohibit MFP users to input fax destinations manually, mark this item as checked.
-
If this item is unchecked, you can impose confirmation when fax destination is inputted manually. Check Require Manual Entry Confirmation to prompt the MFP user to input the fax destination twice to confirm the adding of the manually entered destination.
|
Setting |
Options |
|---|---|
|
Search Fields |
Enter search item(s) allowed to be searched by. You can manually type the search item or pick from dropdown menu beside the textbox. Multiple search items are supported; add a comma between each item, but do not add a space after the comma. Example: “Name” is specified as search item; MFP users can only search for the phonebook names. If “Name,Fax Number1” is specified as the search items, MFP users can search for name or fax numbers. |
|
Display Format |
Specify tokens the way you want the fax accounts to be displayed in MFP screen. The cardinal number (e.g., 0, 1) corresponds to the ordinal position of the fields in Display Fields. Example: Display Fields value is “Name,Fax1,Address”; Enter “{0} [{2}]” to Display Format. The fax accounts will be displayed in the MFP screen with Name[Address] format. |
|
Display Fields |
Specify the phonebook fields you want to use to format the display of fax accounts in MFP screen. You can manually input the fields or pick from the dropdown menu beside the textbox. Multiple fields are separated by comma. |
|
Preferential Order |
The preferred order of fields specified in the textbox are followed when sending the scanned documents or when searching destination contacts. The first field which contain a non-blank value will be used as destination or displayed during search. If all specified fields of the fax contact are blank, then the contact is not displayed when searched. |
|
Disallow Phonebook Search |
If this is checked, [Search] on the Destination Selection screen will be disabled. |
|
Disallow Manual Entry | Require Manual Entry Confirmation |
Also, when this is checked, MFP users are not allowed to add new private phonebook using the Phonebook Entry feature. |
|
Disallow Recent Destination Selection |
History tab displays the most recent destinations used by the login account. Check this if you do not want users to select fax destinations from History tab. |
|
Auto Load Private and Public Phonebook |
Check Auto Load Private/Public phonebook if you want all contacts to display automatically in destination screen. |
-
Setup ODBC and Group Search Setting section.
|
Setting |
Options |
|---|---|
|
Use ODBC? |
Enable to allow Open Database Connectivity (ODBC). The rest of the settings below will be required to setup ODBC. |
|
RightFax Database Server |
Enter the server name or IP address that hosts the RightFax’s database. |
|
RightFax Database User and Password |
Enter the SQL user ID and password to access the RightFax SQL database. This must be independently configured before ODBC search can be used. |
|
RightFax Database Name |
Specify the name of the database where RightFax stores its address book. |
|
Record Limit |
Specify a numeric value to determine the allowable amount of data coming back from SQL server to the device. A maximum of 1000 items can be accepted by the device to display search result list. |
|
Group Display |
Specify how groups are displayed in search results. |
|
Prefix and Suffix |
Enter the Prefix and Suffix which is applied to group items. |
-
Configure Job Settings section. (optional)
-
Use Proxy User Authentication: Uses the value in User ID and Password fields for authentication to RightFax Server only when “Enforce Strict Security” is checked, if unchecked, the authentication using the proxy user information will fail.
-
Enforce Delivery (see error on RightFax Server): MFP login user that is not associated to RightFax account can still use the workflow and perform scan and send fax. However, the scan job will fail, and display error result in both MFP job status and RightFax Server Logs. Administrators can manually add the MFP login user as new RightFax account by checking on the user information in RightFax Server Logs.
-
Prohibit Scan: The MFP user not associated to RightFax server cannot use the workflow.
|
Setting |
Options |
|---|---|
|
Login User does not exist in RightFax |
Specify how to handle MFP user which does not exist in RightFax database. The following options can be selected. |
-
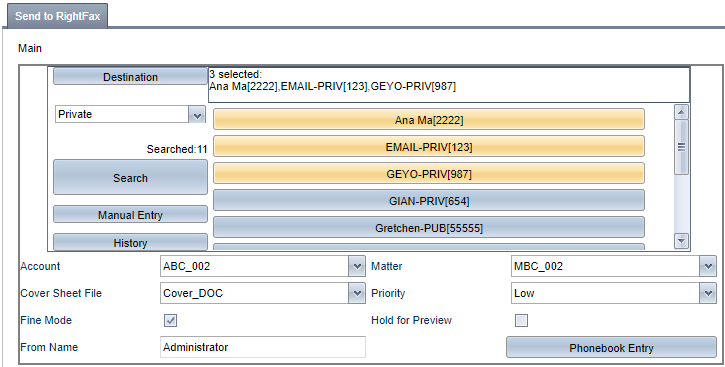
Preset the fax destination and fax information in [Preset] tab. (optional)
-
Save the workflow.