Configure SAML Authentication
Security Authentication Markup Language (SAML) allows a user to sign into the SLNX Admin Console with credentials verified by an Identity Provider (IdP). As a Service Provider, SLNX can communicate with an IdP to authenticate and authorize users:
-
Authentication - determine who is the user is (ID and password)
-
Authorization - determine what the user can access in the SLNX Admin Console (privileges)
A SAML authentication profile can be used to login to the SLNX Admin console only. Login with SAML is not currently supported for MFP login.
At the SLNX management console, users will select the SAML profile only, and click Login to continue. The browser redirects to the authentication provider. Once successfully authenticated, the browser redirects and loads the SLNX Admin Console.
The instructions below demonstrate how to configure SLNX with Microsoft Entra ID as the SAML IdP provider.
1. Register the Enterprise Application in the IdP
You must register with and configure the following options in the IdP:
-
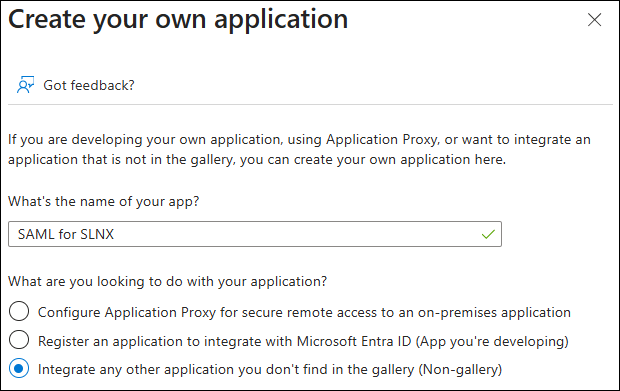
Create an Enterprise application in the IdP that will perform the SAML authentication. Add the application as a 'Non-gallery application'. An example application called SAML for SLNX, created in Entra ID, is shown below:
-
In the Properties screen, click Get Started under 2. Set up Single Sign on.
-
Select SAML as the single sign-on method.
-
In the Setup Single Sign-On with SAML screen, click Edit located within the Basic SAML Configuration section.

-
Leave this screen open while you proceed to the next step to obtain required values from SLNX.
2. Configure the Authentication Profile in SLNX
-
Click [System] → [Security] → [Authentication Profile].
-
Click [Add].
- On the General tab, select SAML from the [Type] List.
- In the Name field, create a name for this SAML authentication profile and then click the SAML tab.
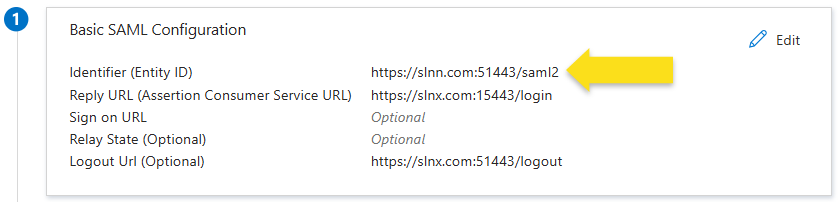
- From the Service Provider Configuration section, copy the provided values and paste them in the IdP's Basic SAML Configuration as noted in step 5 above. Remember to click Save in the IdP once entered.
SLNX Field IdP Field SLNX Entity ID (Issuer) Identifier (Entity ID) Login Endpoint Reply URL (Assertion Consumer Service URL) Logout Endpoint Logout URL - Leave this screen open while you return to the IdP screen.
3. Configure the Claims in the IdP
Configure the claims that will be returned to SLNX in the SAML response. SLNX requires two claims: groups and name.
-
Return to the Setup Single Sign-On with SAML screen in the IdP.
-
Click Edit located within the Attributes & Claims section.

-
Add the following claims to map the necessary attributes to the SAML claims expected by SLNX:
Claim Name Type Value http://schemas.microsoft.com/ws/2008/ 06/identity/claims/groups SAML user.groups
http://schemas.xmlsoap.org/ws/2005/05 /identity/claims/name SAML user.userprincipalname
- Click Save. The result should look as follows.

4. Map the LDAP Group Name in the IdP and SLNX
The IdP allows configuration of the user-associated groups that are included in the groups claim within the SAML assertion. The available options are None, All groups, Security groups, Directory roles, or Groups assigned to the application. If the 'Groups assigned to the application' option is selected, only the groups explicitly assigned to the SAML application will be included in the groups claim.
-
In the IdP, click Users and groups from the Manage menu.
-
Click +Add user/group. In the Add Assignment screen, click None Selected under Users and Groups.
-
Select one or more groups that should be included with the SLNX claim and then click Assign
-
Click the group name to view the group properties.
-
Locate the Object ID field and click the Copy icon beside it.
-
In the SLNX Admin console, click [System] ® [Security] ® [User Roles].
-
Click on the User role that matches the group assigned to the claim in the IdP. At the bottom of the screen, look for the LDAP group name field and then paste the copied value from the IdP to this field.
If you added more than one group to the claim, you can repeat steps 4 through 7 as needed.
-
Save the changes.
5. Complete the SAML Authentication Profile in SLNX
- To complete the profile in SLNX, you need to obtain values from the IdP. For Entra ID, the value is shown in the Set up Single Sign-on with SAML screen, under section 4. Setup SAML for SLNX.Copy the values from the IdP to SLNX, as shown in the table below.

SLNX Field IdP Field SAML Sign-on Endpoint Login URL Identity Provider Issuer Microsoft Entra Identifier Logout URL Logout URL -
To complete the App Federation Metadata URL field, the value is provided in the Set up Single Sign-on with SAML screen, under section 3. SAML Certificates. Copy the value from the IdP to SLNX.
-
Use the table below to complete the remaining fields.
SLNX Field Description Disable Assertion Encryption Select this option if you do not want to encrypt SAML assertions received from the IdP. When disabled, the Key Store File and Password fields are not required.
Disabling encryption may expose sensitive user information and is not recommended for production environments.
Key Store File Path A *.Pfx , *.p12 (PKCS#12) file that contains the private key and certificate used to decrypt encrypted SAML assertions received from the Identity Provider (IdP). To generate or obtain this file, you can create a .pfx file using OpenSSL if you have the private key and certificate files, or you can export an existing certificate as a .pfx from the Windows Certificate Store. Once you have the .pfx file, browse to the file location to upload it here. Key Store
This field is automatically populated after the .pfx file is uploaded.
Key Store Password Click Change Password, and then set the password. This password is used to secure and access the Key Store file containing the cryptographic keys. User Attributes
Defines the user attributes to look at to extract the information.
Login User Name: name
Group: groups
-
Save the authentication profile.
6. Test the Configuration in the IdP
Return to the Single Sign-on page in the IdP, and click Test this application to verify that single sign-on is working as expected.
7. Test the Configuration in SLNX
On the SLNX Admin console Authentication profile tab, you can click the Check Connection option to verify the connection between the IdP and Streamline. If successful, the reports "Connected successfully".
If users are seeing an error message from Microsoft when logging in that indicates "sorry, but we are having trouble signing you in", the cause is likely a mismatch between the entries in the Basic SAML Configuration (in the IdP) and the SLNX Entity ID (Issues) fields. These two fields must match to enable login. The first screen capture shows the field in the IdP. The second screen capture shows the corresponding field in the SLNX Admin console.