Card Reader Bridge Deployment
MFP models relying on the SLNX Hybrid Embedded module for card reader authentication are affected by the SDK/J discontinuation. In these cases, the card readers are physically connected to the controller USB port, rather than the SOP panel. To avoid physically moving the card reader to a new port, you can implement the Cards Reader Bridge software solution to keep the card reader plugged-in on the controller USB port. This solution creates a software bridge between the card reader and the SLNX embedded software responsible for reading and authenticating the card swipe, eliminating the need to move the card reader to the SOP panel port.
The solution is deployed using the SLNX Card Reader Bridge Deployment Tool, and installs two components on target devices:
-
SLNX Card Reader Bridge Module: Communicates with the controller USB port and SLNX Full Native embedded software
-
Cards Manager for Keystroke Bridge: Retrieves the card ID for authentication after a card swipe
Limitation:The card login method must be set to one of Proxy User, Saved password or Secondary PIN. The option for 'Enter Password from Operation Panel' is not supported.
Version Support
The solution is supported for the following versions of SLNX embedded. If one of these versions is not installed on the MFP, you must uninstall the current version and then install the recent SLNX Full Native embedded version instead.
-
24R3
-
24R2
-
24R1
-
23R1
-
3.7
For version 23R1 and 3.7, only the Kerberos authentication profile is supported. For 24R1 and later, all authentication profiles are supported.
Supported Devices
This solution is supported on the following devices, with the minimum firmware listed for each model grouping.
If Card Reader Manager is already installed on the target device, you must uninstall Card Reader Manager before proceeding with the installation instructions below. If you do not perform the uninstall first, the Tool will not install the new version of Card Reader Manager.
1. Prerequisites in the SLNX Admin Console
Prior to performing the Card Reader Bridge Deployment Tool install and configuration, you must complete the following tasks in the SLNX Management Console:
1.2. Update the Embedded Authentication Settings
1.3. Advanced System Settings in SLNX
1.4. Update SLNX Embedded on the target devices
Perform these tasks ONLY during off-peak hours when users are not accessing the target MFPs. These tasks will prevent users from accessing the devices using their access cards until the procedure is complete.
1.1. Find the Target Devices
Only models where the card reader is plugged into the controller side of the device are affected. You can locate a list of affected devices within the SLNX Device list, as demonstrated below.
-
To create a group that will contain the affected devices, right-click an empty space on the Device List navigation and choose [Add Group] from the menu. You will create a filter to automatically add matching devices to this group.
-
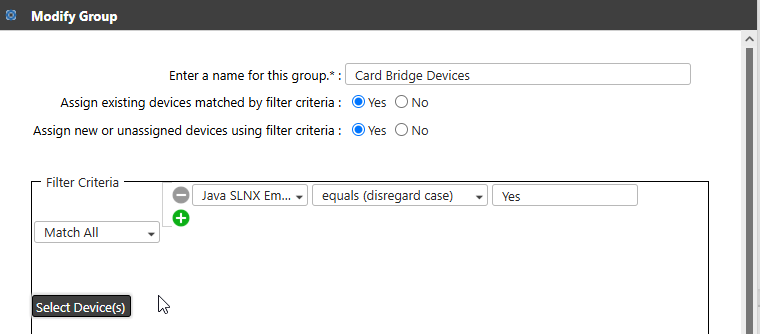
Enter a name that identifies the purpose of the group (something like 'Card Bridge Devices'), and then click [OK]. You need to select this group name in a later step when pushing the software to the devices.
-
Select [Yes] for both Assign options.
-
In the Filter Criteria, choose [Match All], and then select [Java SLNX Embedded] from the first list. Select [equals (disregard case)] as the match function and then enter 'Yes' in the third criteria field.
Refer to the screen capture below to confirm the criteria entries.
-
Click [Select Devices].
-
Any devices matching the criteria are listed and are automatically added to the group.
-
Click [OK] to proceed.
To correctly identify the target devices during a later step within the Deployment Tool, export the target group device list to a CSV format. You can later copy and paste the IP Address column to a suitable import format when identifying the Network Rangewithin the Deployment Tool settings.
-
Click on the target device group to load the Device list.
-
Click [Export CSV] and save the file in a location where you can easily access the file to source the individual IP addresses.
1.2. Update the Embedded Authentication Settings
Set the Embedded Authentication Card Reader setting to 'Smartcard Reader'. This setting does not affect the card reader itself; instead, the setting will allow SLNX to use Cards Manager as the software that retrieves the card ID for authentication after a card swipe.
-
Click [Configuration]®[Streamline NX Embedded Settings]®[Embedded Authentication].
-
Click the default profile (or create a new profile) to edit the settings.
-
Change the Card Reader setting to [Smartcard Reader].
Upload of a .json file is optional in the Card Reader Settings screen. A default file is used if no .json is provided.
-
Save the change.
1.3. Advanced System Settings in SLNX
-
To complete this task, you must login to SLNX with the customer engineer role. Only this role can view the Advanced System Settings Editor in the Streamline NX Management Console.
-
In the Advanced System Settings Editor tab, click [View] and choose [Delegation Server] settings.
-
When applying this change to all Delegation Servers, select [Global Settings]. When applying this change to a specific Delegation Server, select the target Delegation Server.
-
Find the "slnx.embedded.install.hybrid.enabled" key by using the filter. If it does not exist, click (Add) and enter "slnx.embedded.install.hybrid.enabled" for [Key].
-
Set [Type] to "Boolean", and [Value] to "False".
-
Click [Save].
1.4. Update SLNX Embedded on the target devices
-
Click [Configuration] ®[Configuration Tasks].
-
Click [Add].
-
On the General Tab, enter a name such as 'Install Full Native Embedded' and then select [Apply] as the Type.
-
On the Template Tab, click [List]. Select both [SLNX embedded Uninstall] and [SLNX Embedded Install] and then click the right arrow to add both items to the Target template list. Click [OK] to the close the window. This option remove the existing version and then install the default version of the embedded application.
-
On the Target Devices/Groups tab, click [Add Target Group]. Locate the group you created in 1.1. Find the Target Devices above. Click the right arrow to move the group to the Target Groups list, and then click [OK] to close the window.
-
Click [Save] and then click [Run immediately] to apply the template.
2. Install the Card Reader Bridge Deployment Tool
Installation Requirements
The PC running the tool must have connectivity to communicate with the target MFPs. The tool runs on the following operation systems:
-
Windows Server 2019 Standard/Essentials/Datacenter (64-bit)
-
Windows Server 2022 Standard/Essentials/Datacenter (64-bit)
-
Windows 10 (64-bit)
-
Windows 11 (64-bit)
During installation, the tool detects the type of device it is running on, and adjusts to either AES-128 or AES-256 as needed.
Required Files
In addition to the Tool installer, you also need the 'ricoh_card_reader_bridge' zip file from Ricoh. You will use this file when configuring the settings in the Card Reader Bridge Deployment Tool. Copy and extract the file on the same PC where you are running the Deployment Tool.
After extraction, the file contains a .zip file and a .mod file. Note the location of these files on the PC so that you can browse to them in step 2 below.
1. Run the Installer
-
Run the installer as Administrator.
If Amazon Corretto 8 is installed is not found on the machine, a step to install it will be shown. When clicking “Install” it will automatically install the Amazon Corretto.
-
Select the language to use. The tool supports 14 languages.
-
Read the License Agreement then select “I accept the terms in the license agreement”.
-
Select the destination folder. By default the tool is installed at c:\Program Files\Ricoh\StreamlineNX\cbridgeDeployment.
-
Click [Install] to install the tool.
2. Configure the Settings
Locate the destination folder where you installed the tool. Run the CardReaderBridge executable.
Connection Settings
-
Select the language to be used in this UI.
-
Enter the [Device Administrator User name] and [Password]. The administrator account entered here should be a device machine administrator. If the administrator does not have a password, you can leave the password field empty.
-
Enter the [SDK/J Platform password]. This field is required only if the SDK/J platform is installed on the device. A default password is provided. However, if you leave the default or enter another password, the Tool will use the SDK/J platform to install the application on devices. Remove the default password if not required.
-
Click [Continue].
File Selection
-
Click [Browse] to find the location of the previously extracted zip file from the Prerequisites.
-
One at a time, select the .mod file and the .zip file to add each file to the File Selection screen.
You can only add two files at a time to this screen, and one MUST be the mod file and the other MUST be the zip file.
-
Click [Continue].
To use the CSV file you exported in 1.1. Find the Target Devices, first export a sample file suitable for the Card Reader Bridge tool that you can modify.
-
Click [Export]. Save the sample export file locally.
-
Open the CSV file you exported in 1.1. Find the Target Devices, and copy the IP address column only.
-
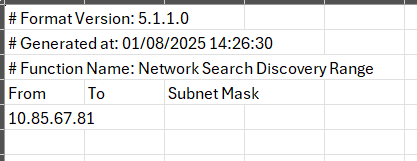
Open the sample CSV file you saved in step 1, and then paste the IP addresses in the From column only. You can leave the To and Subnet Mask columns blank. The format is shown below. Save the file.
-
Click [Import] and browse to the sample CSV file you just modified. Click [OK] to proceed.
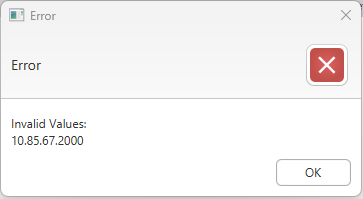
If a problem is detected with any IP address or subnetmask values in the CSV file, a notification is provided. You must fix the value before you can proceed. The entire CSV file must be validated; otherwise, NO values are imported.
-
Click [Continue] to proceed.
The Tool confirms the device models supported and their minimum versions required by comparing the devices against the firmwareVersion.txt file located in the C://Program Files/Ricoh/cbridgeDeployment/firmwareVersion subfolder. If the device is not a supported model OR if the device is not reachable, a Warning message is shown. You can view the Trace Logs in the C:\ProgramData\Ricoh\cbridgeDeployment\tool_log folder.
Update and Install
A discovery process is initiated after you click Continue in the Network Range List screen.
Within the Update and Install tab, each correctly identified model is listed by IP Address, Serial Number, and Model Name as it is discovered. The columns also indicate the current Card Reader Bridge and Cards Manager versions installed on the device (if any).
While processing, a Stop Process button is displayed so you can halt the process if it is taking too long or to make adjustments to your range list. Once complete, the button is replaced with the number of devices found vs. the number of devices selected for discovery. You can download and check the Discovery Log if there is a disparity between these numbers.
-
From the Action list, select [Install].
-
Confirm the list of devices. Check all devices that you want to perform the install upon. Check the box in the column header to select all devices.
-
Click [Run Action] to proceed with the installation.
-
Before starting the process, the Tool verifies that only the 2 required files were uploaded (one .mod and .zip) on the File Selection tab. Otherwise, an error message is displayed:
“You have reached the maximum number of files that can be uploaded. Please remove some files before adding new ones.”
-
The Result column is updated to indicate the result for each device. A 'succeeded' process installed both the Cards Manager and the Cards Manager Bridge on the device. A 'failed' process means that at least one application did not install on the device.
Once the task is fully complete, the Summary tab is enabled.
Summary
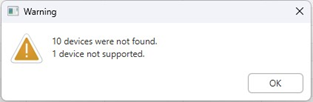
The summary displays the number of devices:
-
discovered
-
not found
-
not supported
The tab provides path information to examine the Trace Log and Device Trace logs to troubleshoot any problem devices. You can click the [Download Log] button to view a text file that include a summary of information that includes the device IP address, process attempted, and result.
3. Confirm Card Reader Behavior
Prior to performing a card swipe test, verify the following:
-
The card reader itself must be running in Keystroke mode.
-
If the card reader is not automatically detected, HID and VID must be configured in the device's Web Image Monitor
-
In the SLNX Admin Console, the card login method must be set to one of Proxy User, Saved password or Secondary PIN. The option for 'Enter Password from Operation Panel' is not supported.
Swipe a card at a target device, and authenticate.
-
If a card swipe is not detected, check the connection to the card reader. If it appears OK, contact support.
-
If the card swipe is detected, but login is unsuccessful, verify that the card is correctly registered.
Implementation Notes
-
The card swipe does not wake up the SOP panel unless the “always display on” has been set (option is set by default in SLNX)
-
The card reader detection feature is not available (the presence is always set to true)
-
The SP mode 5844-100 (Notify support) must be set to 0 in case the following message is displayed “Incompatible USB device“. Reboot the device after setting this mode.
4. Update or Uninstall the Card Reader Bridge and Cards Manager Modules
Update
To update the Card Reader Bridge and Cards Manager module versions on previously installed devices, repeat the steps in File Selection above to upload the new version to the Tool. Repeat the steps in Network Range to identify the target devices, and then ensure that [Install] is selected as the Action on the Update and Install tab. Run Action to proceed, and verify the new version information is updated in the tab.
Uninstall
To uninstall the modules from selected devices, run the Tool and proceed to the Network Range tab. The File Selection tab 'remembers' your previous entry, but since you are not installing, there is no need to modify this tab. Repeat the steps in Network Range to identify the target devices, and then ensure that [Uninstall] is selected as the Action on the Update and Install tab. Run Action to proceed, and verify the result for each device is succeeded.