Create a Shared IPP Printer
Perform this task on a client machine to create a shared printer. Ensure you download a PCL6 Driver for Universal Print before you start.
-
Launch the Add Printer wizard.
-
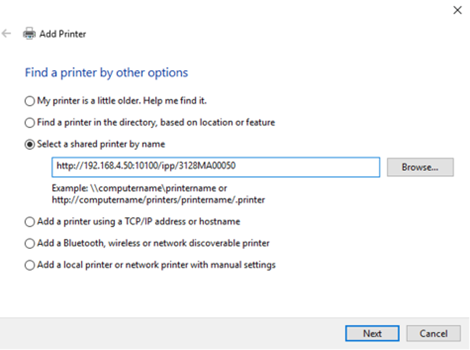
Click "The printer than I want isn't listed"
-
Choose "Select a shared printer by name" and then enter the MIE URL, following this format, as shown in the screen example below:
https://mie_server:port/ipp/serial_number_or_hostname;
-
Replace https with http if SSL is not enabled. If using SSL, the MIE SSL certificate must be trusted by the client. If using self-signed certificates, you must add the MIE SSL certificate to the client's trust store.
-
Replace mie_server:port with the MIE server address and the connection port.
-
Replace serial_number_or_hostname with the device information to print to.
-
- Click Next.
- At the credentials screen, enter a valid Streamline NX username and password. Click OK to proceed.
-
For the print driver, select a RICOH PCL6 driver for Universal Print. Click OK to complete the setup.
-
Perform a test print to verify the setup.
When a user sends print data from an IPP printer, the notification information is added to the Direct Print job queue upon receipt of the Direct Print notification. The user status is checked at the MFP and the following job processing may occur:
-
User login: If the user is logged into the MFP, the notification will continue to be stored in the Direct Print job queue until the user logs out and the print process is started.
-
User logout: Based on the information stored in the job queue for Direct Print, a job is retrieved from DS and sent to the MFP to start printing. After printing of one job is completed, the information is released from the job queue for Direct Print. Job retrieval and transmission are repeated until the queue is emptied in the order in which notifications are received.