Use the Device Manager App
The following screens can be displayed in the SLNX Device Manager app.
- Home Screen
- Select Group/Device List Screen
- Device Details Screen (Description/Status History/Details/Photos)
- Settings Screen
- About Screen
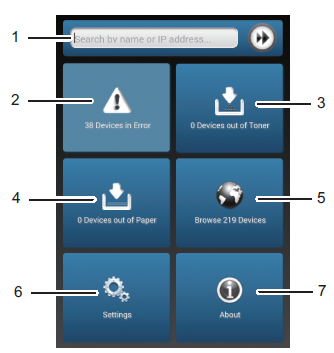
Home Screen
The functions of the buttons displayed on the home screen are as follows:
-
Search: Performs a search based on the name or IP address of a device.
-
Error: Displays the number of devices on which an error other than the out-of-toner/paper error occurs. Press to display the details.
-
Out of Toner: Displays the number of devices that are out of toner. Tap to display the details.
-
Out of Paper: Displays the number of devices that are out of paper. Tap to display the details.

-
Browse Devices: Displays all the devices that are managed in SL NX. Tap to display the select group/device list screen. For details about the select group/device list screen, refer to Select Group/Device List Screen.
-
Settings: Press to display the configuration screen. For details about the configuration screen, refer to Settings Screen.
-
About: Press to display the [About] screen. For details about the [About] screen, refer to About Screen.
When the devices managed with [Group Restrictions] are restricted by role, the number of devices displayed on the home screen varies depending on the role of the logged-in user. For details about configuring [Group Restrictions], refer to Configure Group Restrictions.
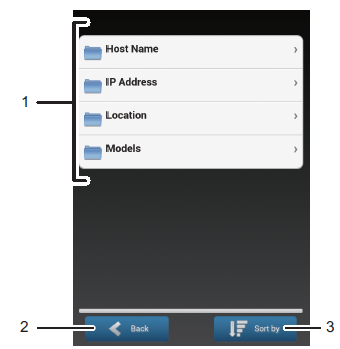
Select Group/Device List Screen
The functions of the buttons displayed on the select group/device list screen are as follows:
-
Group/Category/Device List: Displays the device list for each group or category. Tap a group or category to display the list of devices in a group or category. When there are sub groups, the sub groups are displayed.
-
Back: Returns you to the previous screen.
-
Sort by: Tap this button to sort the list by the name, address, or status.

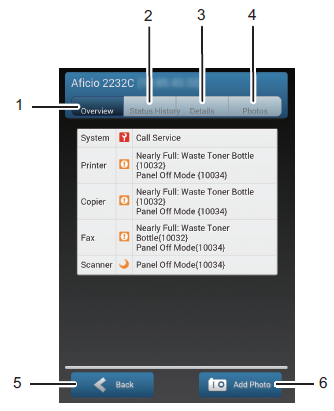
Device Details Screen (Description/Status History/Details/Photos)
The functions of the buttons displayed on the device details screen are as follows:
-
Overview: Displays the status icons of the functions (the system, printer, copier, fax, and scanner functions that are available on the device) on each device and a description.
-
Status History: Displays the history of the device status changes (the date the status was recorded, status icon, description text, and other information).
-
Details: Displays the properties information of the device in the following four categories: Main Properties, Status Details, Counters, and Toner Level. Scroll through the screen to view all the information.
-
Photos: Displays the images that are registered as the photos of the selected device.
-
Back: Returns you to the previous screen.
-
Add Photo: Tap this button to select a photo that has been captured by the camera on your mobile device. Confirm the photo to add, and then enter a description. You can now configure the added photo to be displayed by default.
To upload a photo, log in using an ID with DeviceBasicWrite privilege.
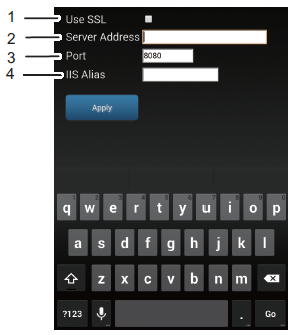
Settings Screen
The functions of the buttons displayed on the settings screen are as follows:
-
Use SSL: When selecting this check box, use HTTPS to establish a connection to the RICOH Streamline NX server.
-
Server Address: Enter the host name or IP address of the Core Server.
-
Port Number: Enter the port number of the Core Server. "8080" is specified by default.
-
IIS Alias: Enter the destination IIS alias. Leave the field blank if IIS is not used.
[Use SSL] is always selected when you are using the iOS app. Also, the port to be used for HTTPS communication is selected as the default port number of the server.
About Screen
Use the About screen to confirm the system version information. The functions of the buttons displayed on the about screen are as follows:
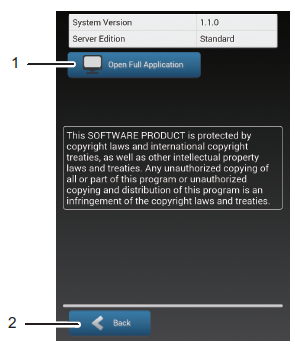
-
Open Full Application: This opens the web Management Console in the default web browser on your mobile device.
-
Back: Returns you to the previous screen.