Configure the Notification Function
Specify when and where to send notifications and the metadata to be included in notifications.
-
On the [Workflow Design] tab, click [Notification] tab.
-
Select the [Enable Notification] check box.
To disable the notification function, clear the check box.
-
In [Notification Settings], specify the trigger for sending notification, destination, language to use in the notification email, and email server.
-
Failed jobs only
-
Successful jobs only
-
Both failed and successful jobs
-
Enter the destination e-mail address of the notification. To enter more than one e-mail address, separate each address by a comma (,) followed by a space. Up to 512 characters can be entered.
-
To select an e-mail address that is registered SLNX, click [Copy from System Address Book]. Select the email address, and then click [OK].
-
Configure the e-mail server for the destination e-mail address of the notification.
-
This can only be configured for workflows where [On Device] is selected in [Location]. In workflows where [On Server] is selected in [Location], the network settings in RICOH Streamline NX are used.
-
SMTP Server Address
-
SMTP Port Number
-
Authentication Algorithm ([None], [POP before SMTP], [SMTP])
-
POP3 Server Address
-
POP3 Port Number
-
Account Name
-
Password
|
Item |
Description |
|---|---|
|
Enable Notification |
Specify whether or not to notify the deliver result. |
|
Triggers |
Specify when a notification is sent. |
|
Destination |
|
|
Language |
Select the language to be used for notifications |
|
Email Server Setting |
Specify the following items: When [POP before SMTP] is selected in [Authentication Algorithm], specify the following items: |
-
In [Add/Delete Metadata Field], add the metadata elements to be included in the notification:
In [Add/Delete Metadata Field], click [Add]. The [Metadata Fields] window is displayed.
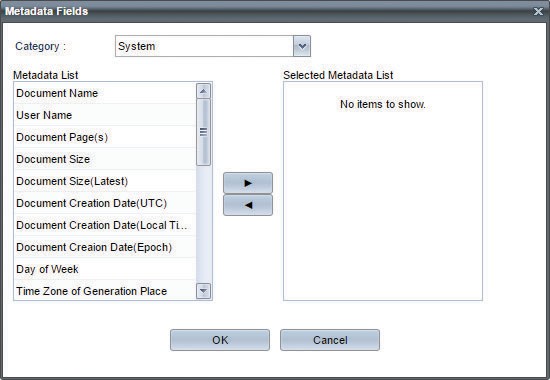
Select the category of the metadata tag from the [Category] drop-down list.
- In [Metadata List], select the metadata element to add, and click
 . To remove an element, select the metadata element in [Selected Metadata List], and click
  .
.
The value of metadata used in notification emails will be the last updated value of the last executed process in the workflow when latest ContentSize, latestDocType, etc. metadata types are selected.
- Repeat steps a and b to add more metadata elements as necessary.
-
Click [OK].