Getting Around the Management Console
The example screen below depicts the layout of the Management Console while showing the Device List screen.
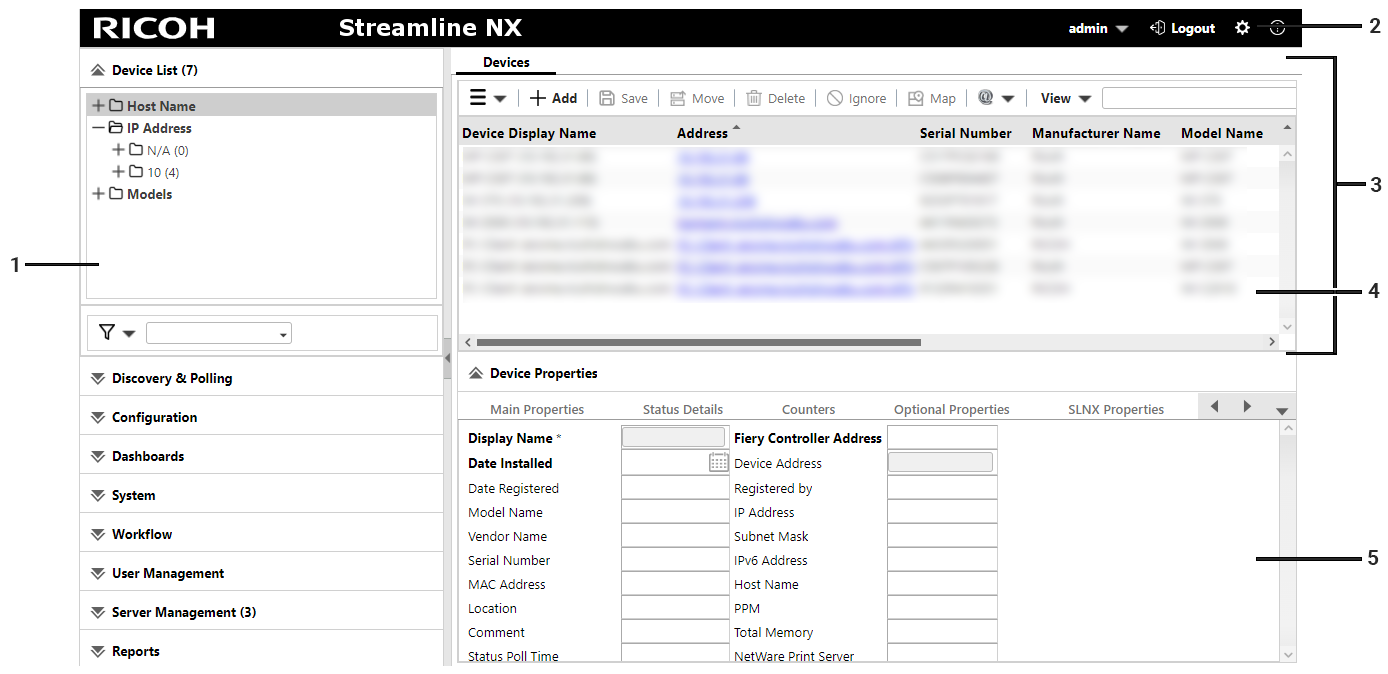
|
Layout Feature |
Notes |
|---|---|
|
The navigation tree is divided into different functions. To display a detailed item in tree view, click a category title. |
|
Click the configuration wizard to display the links to various setting screens. You can configure the settings for different purposes by following the instructions on the screen. |
|
To add a new tab and display the operation screen, click a detailed item in the navigation tree. Click tabs to switch between different operation screens. To close multiple tabs at once, right-click a tab and select [Close All but Current] or [Close All]. |
|
Various lists such as the device list and task list are displayed above the tab area. Various icons are displayed in the toolbar in the list area. Use these icons to perform operations such as creating a new setting item or importing/exporting the setting items. The displayed icons may differ depending on the function. Click the title bar of the properties area to open or close the area. Drag the title bar to change the size (height) of the area. |
|
When an item is selected in the list area, detailed information of that item is displayed below the tab area. Use the properties area to configure the settings of the item. |
Bookmarks and Page Navigation
As a browser-based application, SLNX offers the ability to bookmark particular pages that you use often. Navigate to a tab that you want to bookmark, and use your browser's bookmark feature to bookmark the tab. If you log out of SLNX and then load the bookmark, you must enter your credentials on the log in screen, after which the browser will load the bookmarked tab.
You can also use the browser's forward and back buttons to page through the tabs you have loaded previously.
Time and Time zones
Within SLNX, time is handled in different ways based on the following:
-
All times for device activity stored in the Core Server database is reported in the Core Server's local time.
-
Time displayed in the SLNX management interface is based on the browser settings.
-
Tasks are run according to the Delegation Server's local time. If you create a task that will be applied to all devices, and the devices are managed by two different Delegation Servers, the task will run at different times if the servers are in different time zones.
Change Your Password
You can change your password for local user accounts only. If your user account is managed by LDAP or Kerberos, you cannot change your password within SLNX. Follow these instructions if logging in with a local account only.
-
Click the user name at the top right of the Management Console.
-
Click [Change Password].
-
Enter the current password and a new password in the dialog box that appears, and then click [OK].
Change the Display Settings
Specify the country where the product is used, the custom properties, and the display format of the date and time in the display settings of the Management Console.
Change the Default Country Setting
The region setting of the operating system installed on the Core Server is set by default as the country setting in the Management Console. When the system is being operated in more than one country, it is recommended to specify the country where the number of the devices to be managed is the largest for the default setting. The country information is requested in the following cases:
Activate the License
Activation must be performed after the country setting has been configured correctly to the target country.
Use the RICOH Software Server
To obtain the list of Device Applications from RICOH Software Server, the country setting in the template must be configured correctly.
Also, the correct country information is required to activate Device Applications.
-
Click [System] → [Server Settings] → [Display].
-
In [Country Setting], select a country.
-
Click [Save].
Configure Custom Properties
Configure Custom Properties to save device specific information as a device property. For example, you can create an item name such as control number or asset number and save the value of the created item on each device.
The custom properties are displayed on the [Optional Properties] tab in [Device Properties]. To configure a value in the Custom Properties, select a device in the device list, and then click [Optional Properties] [Custom Property].
By configuring a device custom properties, you can enter the actual values for each device in the custom fields.
-
Click [System] → [Server Settings] → [Display].
-
In [Custom Properties], click [Configure Custom Properties].
A pop-up dialog displays 20 custom properties.
-
Double-click on one of the custom properties.
-
In the box, input the name of the property.
-
Click (Save).
If you want to find a specific property, use the filter feature.
-
-
Click [Save].
Renaming the custom properties allows you to identify the property when it get displayed on the device's device properties.
After configuring the custom properties, you may need to log in and out of SLNX to see the properties displayed on device properties.