Create a Policy Notification
Complete the task Create a Destination Notification before you complete these steps.
-
Click [System] → [Notification] → [Policies]
-
In the Policy tab, click [Add].
-
Enter the name of the policy. The name must not be a duplicate of the existing policy notification.
-
Select the Definition Type. Select one of the following types:
- Polling – Configure discovery notification settings for when to send notifications and how they are sent.
- Discovery – Configure polling notification settings for when to send notifications and how they are sent.
-
Select the destination you created with Service Now URL as type.
-
Click Save. Clicking save will create the policy notification. You can find the notification properties on the tabs.
-
Go to the Triggers tab and select the triggers for this notification.
Items
Triggers
Errors
Select from the following the type of errors you want to specify as Simple Criteria:
-
[Select All] – Checks all errors.
-
[No Toner/Ink]
-
[Paper Misfeed]
-
[Call Service]
-
[Cover Open]
-
[Device Access Violation]
-
[No Paper]
-
[No Response]
-
[Original Misfeed: ADF]
-
[Fax Transmission Error]
-
[Error]
Warnings
Select from the following the type of warnings you want to specify as Simple Criteria:
-
[Select All] – Checks all warnings
-
[Offline]
-
[Toner/Ink Almost Empty]
-
[Alert]
-
[Replace/Supply]
-
[Maintenance]
-
[Busy]
-
[Almost Out of Paper]
-
[Energy Saver Mode]
-
[Warming Up...]
Advanced Criteria checkbox
When is checked, the simple criteria screen changes to the advanced criteria screen. By using variables on the Advanced Criteria screen, you can configure more detailed notification criteria. You can only configure either Advanced Criteria or Simple Criteria.
All selections made in Simple Criteria will be removed if you choose to use Advanced Criteria.
-
When the devices in the Monitored Devices tab experience at least one of the selected errors or warnings and the conditions are met, a notification is sent to the recipients.
-
Click the Conditions tab to specify the conditions.
Conditions
Triggers
Block if not Settled
If checked, it disables repeated notifications in the specified period. Specify the interval using the following units:
[Time Interval]: [day(s)], [hour(s)], [minute(s)], [month(s)], [second(s)], [year(s)]
Notify only if criteria is repeated within specified time interval
If checked, a notification is sent only when the specified status occurs for the specified number of times during the specified period.
Required settings:
[Repeat Count]: Specify the number of repetitions.
[Time Interval]: [day(s)], [hour(s)], [minute(s)], [month(s)], [second(s)], [year(s)]
Notify only if criteria is sustained for
If checked, a notification is sent only when the specified status continues for the specified duration.
Required settings:
[Time Interval]: [day(s)], [hour(s)], [minute(s)], [month(s)], [second(s)], [year(s)]
Resend Notification
If checked, a notification is sent again after the specified time has passed.
Required settings:
[Time Interval]: [day(s)], [hour(s)], [minute(s)], [month(s)], [second(s)], [year(s)]
Notify on cleared conditions
A notification is sent when the notified status is resolved.
-
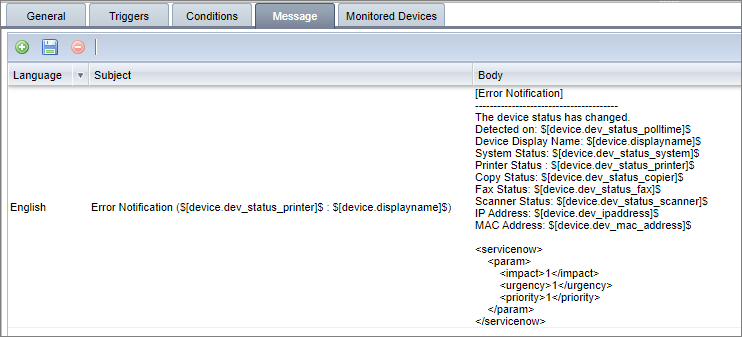
Click the Message tab and define how the Incident is created in ServiceNow.
- By default, a message is created, click the message to edit it. You can also create a new message item if you want.
- Specify the Subject of the message. The subject will be stored as short_description in ServiceNow incident table.
- Specify the Body of the message. The body will be stored as comments in ServiceNow incident table.
Message body cannot be greater than 1024 characters. Returns, extra spaces, tabs count as characters. Removing additional characters will not affect the application.
- Add the <servicenow>….</servicenow> xml structure to the Body. All data outside of the XML structure will be stored as comments in ServiceNow incident table, while data inside the <servicenow>….</servicenow> xml structure will populate the other fields in the ServiceNow incident table.
An example is shown below:
Add the following string at the end of the body.
<servicenow>
<param>
<impact>1</impact>
<urgency>1</urgency>
<priority>1</priority>
</param>
</servicenow>
In the above example, the ServiceNow fields: impact, urgency, and priority are set to value = 1.
The above tags inside the <param> … </param> are the ServiceNow field names, not the display names on the form. To determine the proper field name, go to the ServiceNow interface and under “System Definition” click Tables. Search for the word “Incident”. Click on the field name, use the value in the “Column Name” Field.
This is another example:
<servicenow>
<param>
2 <requested_by>Ricoh</requested_by>
3 <requested_for>Ricoh</requested_for>
4 <u_business_unit>ABC Corporation</u_business_unit>
5 <description>Error Notification ($[device.dev_status_printer]$ : $[device.displayname]$)</description>
6 <impact>1</impact>
7 <urgency>1</urgency>
8 <priority>1</priority>
9 <cmdb_ci>Enterprise Print Services</cmdb_ci>
10 <u_subtype>Hardware Failure</u_subtype>
11 <assignment_group>Service Desk/MPS</assignment_group>
12 <u_alert>true</u_alert>
13 <contact_type>event</contact_type>
</param>
</servicenow>
When the incident is created, the following will be displayed in the incident table.
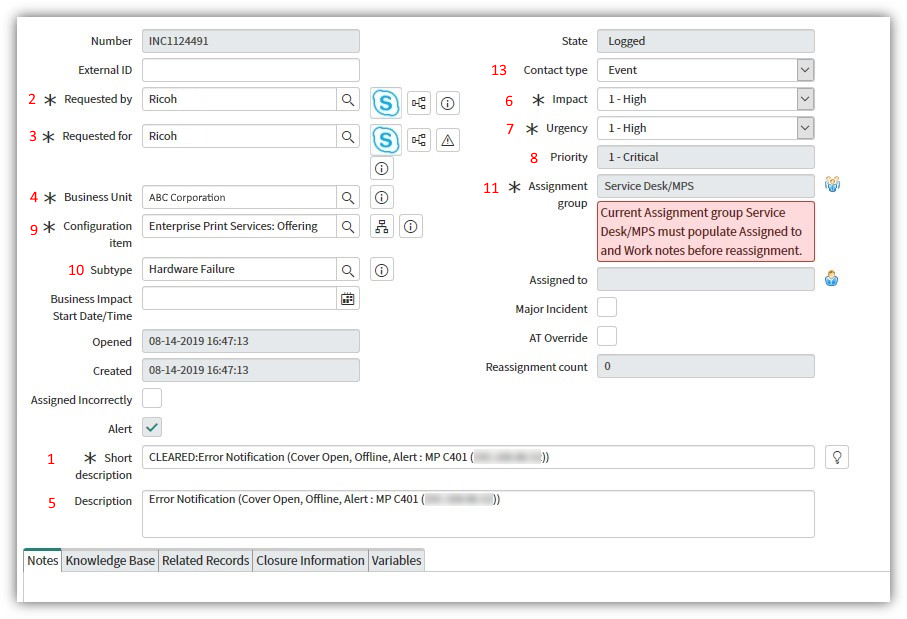
The Subject of the message is treated as 1 Short description. The above screenshot is for example only, your actual ServiceNow format may differ from the example provided.
-
After modifying the message, click Save.
-
Click Monitored Devices tab and the devices or group you want to keep track.
If the device or groups selected in this step encounters the triggers set in Step 7 and conditions in Step 8 are met, an incident will be created based on the field value specified in the message setting in Step 9.
-
After making all necessary changes, click Save.