Add Tags to a Template
Ensure that you have a strategy in mind for assigning your custom tags. For example, if you created one template in Streamline NX that contains all IPS settings, you might need only one security tag called ‘IPS’. However, if you configured settings that comprise an IPS policy scattered throughout many templates, you may need individual tags that you can apply to templates. In this second case, you may have tags such as SSL, TLS, HTTPS, etc. You can then apply the individual tags only to the templates that contain specific IPS settings.
Each time you create and assign a security tag in Security Analyst, the Security Templates charts are updated with new data.
Follow these instructions to create and apply tags:
-
Login to Management console.
-
Click [Dashboard] and expand [Security Analyst], then click [Security Template].
-
All templates created within Streamline NX appear in this list. You only need to tag the templates that are related to your security concerns.
-
Locate the template in the list that you want to tag and click in the [Security Tags] column.
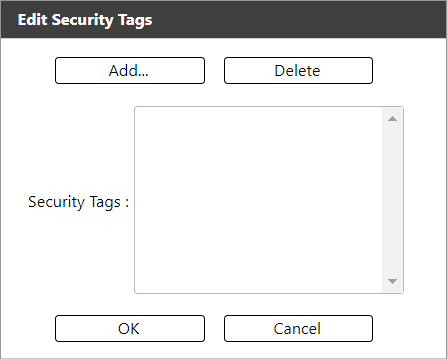
The Edit Security Tags screen appears.
-
Click (Add…).
-
In the Add field, type a tag. Special characters are not permitted; however, the underscore _ and ampersand & are acceptable characters. You can enter up to 255 characters in this field.
If you want to re-use a tag, simply type the tag in the EXACT spelling as the existing tag. For example, if the tag name was IPS, type IPS again to use that tag.
-
To add another tag to this template, click (Add...) again and enter another tag.
-
When done, click OK to close the Security tags screen.
The security tags column update to show the tags you assigned to this template.
The Template Policy Coverage displayed at the top of the screen updates to include the new tags you assigned. The individual tags are listed in alphabetical order, and you can click the > character to scroll through additional tags.
You can filter the Security Tags column in several different ways, including alphabetically. Click the small arrow to the right of the column and select an option to sort the column contents.